Monday, September 27, 2010

Mooncake...Not!


This is a delayed posting because I was on my holiday visiting family and friends in Philippines. I wanted to bake something for my family because I do miss having my family appreciating/criticizing my work! Baking in Korea is different; I only have my H to taste my baking.  At first, I thought of making a fondant cake, but I have hesitations if it would travel well. Should I or shouldn't I go for fondant cake...?


Well, I didn't. Since Mooncake festival was coming up, why not make mooncake?! This is not your ordinary mooncake; it's an apple pie mini mooncake!


Mooncake festival also known as Mid-Autumn festival is celebrated every fifteenth day of the eighth month of the lunar calendar in China, and basically all Chinese community around the globe. It is believed that this time of the year is when the moon shines at its brightess. Legend has it that in the thirteenth century, Chinese used mooncakes as a medium to hide messages to spread the plan of revolt against the Mongolian rulers. There's actually other legends behind the Mooncake festival, but I won't go into it anymore.


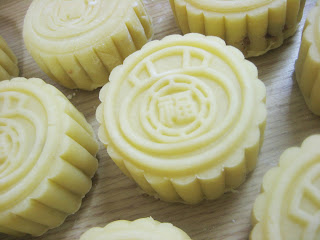
molded mooncakes before baking


my cookie stamp mold


Mooncakes are pastries that are as big as a human palm that is filled with sweet dense fillings. Traditional fillings are lotus seed paste with salted yolk on the center, sweet black bean paste, and mixture of pickled melon and nuts. There's also another version of mooncake, which is called snow-skin mooncake. This was created around the 1980's. The snow-skin mooncake has a soft outer cover that is made from glutinous rice. There are now loads of modern versions of mooncakes from durian filled to ice cream filled, basically more choices now to choose from especially in countries like Singapore and Indonesia.


Back to my version, I used pate brisee for my pastry and apple walnut cinnamon for the filling. I don't think the pastry was the right choice though, because it didn't hold the engraving from my cookie stamp. Yes, I used cookie stamp instead of a traditional mooncake mold. I was actually optimistic to find a wooden mooncake mold here in Korea because they have a similar dessert that uses a similar mold. Indeed I found a wooden mooncake mold, but the price made my heart drop! About $90 for a wooden mold! I wasn't prepared to pay that, so I improvised with a $10 cookie stamp instead, and I was lucky to find a stamp that has the Chinese character for lucky engraved on it.  It actually worked really well, for my apple pie mini mooncake project!


filling and molding the mooncakes


I'm really happy how this project turned out. Next Mid-Autumn festival I'll try to use the traditional pastry for a mooncake, and try to hunt down a reasonable priced wooden mold!


Bisou bisou,


Charlotte

Daring Bakers' Challenge - September 2010: Decorated Sugar Cookies


Ay yay yay... Just came home from my holidays; been really busy lately that's why my blog has gone quiet for a couple of weeks, but now I'm back just in time to post my DB challenge.


 Blog-checking lines: The September 2010 Daring Bakers' challenge was hosted by Mandy of "What the Fruitcake?!" Mandy challenged everyone to make Decorated Sugar Cookies based on recipes from Peggy Porschen and The Joy of Baking.


The theme for the sugar cookies is 'September'; basically whatever September means to you, be it spring, autumn or back to school. For me, this year's September means friendship; my girl-friends and I are in a long distance friendship. We live in different countries (Australia, Canada, Hong Kong, Korea and Philippines) now, so having girls night out or coffee dates are close to none. One of my girls, CT, got married this September, and everyone, including me, made sure we're all complete for the special day... reunion at last!


I was actually thinking of what to bake for the girls as a little something from me. So this challenge was really handy. I gave the girls personalized cookies by piping their initials on the cookies. Piping job is not an easy task at all. I absolutely respect sugar cookie decorators because this job involves a lot of patience, creativity and precision. My first reaction when I saw this challenge was - 'easy'. I was proven completely wrong! I definitely have loads of improvement to do with my piping. Despite the nonidentical pipings, the cookies tasted fabulous. I baked some extra for personal munching!


Bisou bisou,


Charlotte

Saturday, September 18, 2010

The Empty House Cupcake


What do you do on a Saturday night, when the baby is asleep and the husband is out at his brother's bachelor party? Make cupcakes, of course!

I was faced with this scenario this evening. The house was so quiet that you could hear a pin drop...well, except for the hum of the monitor, but I don't even hear that anymore (yet the tiniest sound of movement through it clicks back into my consciousness). Even the dog is jumping and barking at phantom noises. I closed a cabinet, and she was barking at the front door.

The recipe I chose was for Doughnut Cupcakes. They promised the taste of a doughnut without the deep-frying. I'm all for that! The recipe comes from the King Arthur Baking Sheet CD I bought last weekend--this one from the Jan/Feb edition back in 1993. They came from a column entitled "Take It Easy," and they certainly delivered on that promise. From the moment I decided to make the cupcakes to the time they were cooling on the wire rack was only 50 minutes. That time probably could have been even faster, if I hadn't had to wait for the oven to preheat.

I did make two adjustments to the original recipe. First, it called for shortening. Yuck! I will not allow Crisco in my house. So, I subbed in butter, as I always do. I expect better of King Arthur, but maybe times were just different in 1993, and they didn't realize how bad shortening is (though it was always a vile substance, so I'm skeptical). Second, the original called for regular milk. I didn't have any in the house, so I used buttermilk.

The results were quite yummy, if not quite doughnut-like. Of course, that could be because of my substitutions. To me the biggest similarity to doughnts was the nutmeg and cinnamon sugar flavors. Nevertheless, they make a very satisfactory cinnamon-sugary cupcake.

Doughnut Cupcakes
adapted from King Arthur Flour Baking Sheet Jan/Feb 1993

1/3 cup butter, softened
2/3 cup sugar
1/2 cup buttermilk
1 egg
1 1/2 cups all-purpose flour
1 1/2 tsp baking powder
1/4 tsp nutmeg
1/2 tsp salt

Topping:
2 Tbs butter, melted
cinnamon sugar

Preheat oven to 350.

In a mixing bowl, cream together the butter and sugar. Beat in the milk and egg. Add the flour, baking powder, nutmeg, and salt, and beat at medium speed of an electric mixer for 2 minutes.

Spoon batter into 12 muffin cups, filling each about halfway. Bake in preheated oven for 25 minutes, until a toothpick comes out clean. Brush tops of cupcakes with melted butter, and sprinkle with cinnamon sugar. Wait 10 minutes, then remove from pans to cool completely.

Makes 12 cupcakes

Cost: $0.14 Yup, that's 14 CENTS per cupcake. You can't beat that!

Friday, September 17, 2010

Friday Nights at Santiago's


As we entered Santiagos, Glynnis was processing a basket full of mangos for the night's fresh mango margaritas. The special was either: 1) a fresh shrimp salad complete with sliced avocados, or 2) a nicely seasoned steak with a bean medely.
Both were so very well done that we must give Karina another 4 stars for the detail she put into these specials, which you are guaranteed every Friday night here at Santiagos.

Thursday, September 16, 2010

Chicken and Rice "Stoup"


People have very strong opinions about Rachael Ray. I've heard it all--she's annoying, her recipes lower our standards for food, she's just cashing in, etc, etc, etc. Well, I'll tell you this. The woman knows how to get dinner on the table in 30 minutes, and when you are a new mom, that is invaluable. Over the last nine months, I have fallen in love with Ms. Ray's recipes and cooking/writing style. For quick meals, she uses very little processed ingredients--from the recipes I've picked (and there have been a lot of them since Jasper was born), the most packaged ingredients I've used are canned broth and some frozen veggies. Not bad at all. And the recipes really deliver--of the many I have tried, we have only disliked one and had one complete disaster (which was not the recipe's fault--it was cook's error). I will openly admit that I own almost every Rachael Ray cookbook, and I will further state that they are used more than any other single author on my shelves at the moment (which says a lot, considering that I have close to 200 cookbooks on those shelves).

The weather has been getting brisk here in New England, so I decided to make a Chicken and Rice "Stoup" recipe, from 365: No Repeats. "Stoup," for those not well-versed in Rachael Ray-speak, is somewhere between a soup and a stew. This one was warm, and comforting, with perfect seasonings. And, it was super easy to make. Very little active time was involved, so that dinner could get on the table and the baby could be entertained all at once. This recipe is a keeper. I'm sure it will grace my table throughout the cold weather season.

Chicken and Rice Stoup
adapted from Rachael Ray 365: No Repeats

2 cups chicken stock
3 Tbs extra-virgin olive oil
1 Tbs unsalted butter
1 1/2 to 2 lbs chicken breast tenders, cut into bite-sized pieces
2 medium leeks, cut lengthwise and then sliced into half-moons
1 bay leaf
1 cup carrots, chopped
2 celery ribs, chopped
3 tsp. dried thyme
6 cups chicken stock (I used Swanson)
1 1/2 cups white rice

Heat a Dutch oven over medium-high heat. Add olive oil and butter. When butter melts, add the chicken to the pan and saute until lightly golden on both sides, about 4 minutes.

Add leeks, bay leaf, carrots, celery, and thyme. Cook for about 3 minutes, until the leeks wilt down.

Add all 6 cups of stock and bring to a boil. Stir in the rice and cook until rice is just tender, 15 to 18 minutes. (There was no instruction in the original recipe for the cover to be on or off, so I left it off. It worked fine this way.) Adjust salt and pepper seasoning to taste.

Serves: about 6

Note: If you have leftovers, the rice will absorb all the liquid, giving you a "chicken and rice" meal, with no "stoup." This was fine with me--it was still delicious--but, if you want the soup consistency, have another can of broth on hand to thin it out when you reheat.

Cost: $2.69 per serving

Wednesday, September 15, 2010

Rugelach & Honey Cake


Nothing odd about rugelach or honey cake, but they are certainly delightful items... For Rosh Hoshanah (yes, I am Chinese) this year, we went to our dear pal Shira's for a warm Fall dinner... I made rugelach and a moist, flavourful honey cake... the honey cake called for strong coffee (or you could use strong tea -- I used a mega strong cup of tea), orange juice and a myriad of spices, along with vegetable oil... you mix it all up and pour it into a bundt pan! I made a quick glaze using lemon juice and icing sugar, and candied some lemon slices by blanching them in water, then boiling them in simple syrup (equal parts sugar and water, boiled til syrupy) for a garnish.

Recipe for honey cake found HERE. It has the name "Majestic & Moist New Year's Honey Cake" which is pretty much the greatest name ever. MAJESTIC!

I had made rugelach once before and it's so much fun to make... the dough is a mixture of butter and creamcheese, which makes it very rich. You have to chill the dough first and then roll it out like a big old pizza round... you feel like you're making a pizza too. First you brush it with apricot jelly, then sprinkle it with ground walnuts, sugar and cinnamon, then you put your larger "fillings" in... mini chocolate chips and currants for me. I used Martha Stewart's recipe for rugelach, which can be found HERE.

Shana Tova everyone!

Tuesday, September 14, 2010

New to the Kitchen: Cost Analysis & BYOB

I am adding a new feature to my blog, starting with the the previous post. From now on, I will be including a cost analysis for each of the recipes I make. Why, you may ask? The last year has brought many changes to the neon celery kitchen. Among those changes has been a move from being a two-income household to just the one. While our change has been (mostly) by choice, I think a lot of people are finding themselves in similar situations these days. So, I thought I would share my calculations with you.

For me, calculating the cost of each recipe is a way to keep track of where my grocery money is going, and gives me confirmation that cooking at home is not only healthier for our bodies, but also for our wallets.

Along the same lines, I have joined up with BYOB--that's "Bake Your Own Bread." They are a group of bloggers who have taken the pledge to bake all of their own breads, rather than buying them at the grocery store. They are an inspiration to me, and I am looking forward to the challenge.

I hope you enjoy the new features. Happy cooking/baking!

Monday, September 13, 2010

A Politically Incorrect Bread


I just got home from Vermont. I love Vermont. The rolling hills are beautiful. The air is fresh and crisp and clean. The people are friendly. There's a chance you might see a moose. And the King Arthur Flour store is there. The only thing I don't like about Vermont is that I have to spend a good portion of my visit giving myself pep talks about why I haven't just picked up and moved there yet. (Work, work, and work. There just aren't jobs in my husband's field there, and we need money to live--even in Vermont.)

As a bonus for going to the beautiful wedding of close friends, I got to visit the King Arthur Flour store. That store is so dangerous for me. But, I did walk out relatively unscathed. I bought a one-pound bag of cinnamon chips, because it has been driving me crazy that I can't find them (the supermarket sells cinnamon chip muffins, but not cinnamon chips--so where do they get their cinnamon chips????). I also bought a CD with the first ten years of the Baking Sheet--King Arthur's newsletter--on it in PDF format.

Upon returning home, I had some distinct emotions. The first was travel-weariness. In the last six weeks, we have traveled to Chicago, Florida, and Vermont. All with an infant. Not easy. I am standing firm that I am not leaving for an overnight trip until Thanksgiving. The other emotion was excitement for fall. Fall has already come to Vermont, it seems. New Hampshire is lagging behind. And then, as excitement for fall almost always translates for me, I was ready to bake.

So, I opened up my new CD and found a recipe for a bread machine bread that would work well for peanut butter and jelly sandwiches. Kurt starts a new job tomorrow, and we don't know what the lunch situation will be--if there will be a fridge, a mircowave, etc. So, a sandwich is a safe bet. And a sandwich on homemade bread is just that much better. I found a recipe for "Squaw Bread" that looked very interesting, if a bit derogatory. I mean, who uses the term "squaw" anymore? In any case, the recipe looked good, and I decided to try it.

The results were excellent. The whole grain flavor doesn't overpower the whole loaf. Instead, it lends a sweetness to the soft, chewy bread. It was just perfect under a schmear of cream cheese for breakfast this morning.

Squaw Bread
adapted from King Arthur Flour's Baking Sheet Mar-Apr 1997

Makes 1 (1 1/2 lb loaf)

3/4 cup (6 ounces) buttermilk
1/2 cup (4 ounces) water
2 Tbs. canola oil
1 1/2 Tbs honey
2 Tbs raisins
2 Tbs light brown sugar
1 1/2 cups (6 ounces) bread flour
1 1/4 cups (5 ounces) white whole wheat flour
3/4 cup (3 ounces) rye flour
1 1/2 tsp. sea salt
2 tsp. yeast

In a blender, blend buttermilk through brown sugar. Put this mixture into bread machine, followed by the rest of the ingredients. Bake on basic or white bread program, with light crust setting.

Cost: $1.69 for the loaf
Specialty whole grain sandwich loaf at supermarket bakery: $2.99
I submitted this post to the BYOB monthly round-up. You can see what the other BYOB bakers were making in September by clicking here.

Tuesday, September 7, 2010

It's OUT!!!

LOL..I cant help but laugh every time I watch this music video cos I look ridiculously funny in here...lol!
Oh well, I like the song though..

Monday, September 6, 2010

Rugelach


As I mentioned in one of my previous post, I have quite some supply of cream cheese. Well just two packs actually, but for two people it can stretch to bountiful delights. So far I was able to produce tiramisu, cheesecake, red velvet cupcakes, and hazelnut praline cream cheese ice cream. Now to consume the last remains of the cream cheese, I decided to make rugelach to give to our friends, L&M, as a little something to congratulate them for their new abode.


The word rugelach derives from the Yiddish word rugel, which means royal. Rugelach is a Jewish cookie that is shaped similar to a bite-size croissant. The cookie is made out of a cream cheese cookie dough, and filled with jam, nuts, fruits, poppy seeds, cinnamon, chocolate or raisins.


My rugelach that I filled with chocolate


I learned of this cookie way back when I was a teen. My sister J was the one who shared this delight to me. I was lucky enough that she still got the recipe, so I was able to relive the luscious taste that's been lingering on my taste memory bank for so long. Taste memory bank... umm, is there such thing? Anyway... I seemed to have this impression that the cookie had a distinct cream cheese taste, but I have remembered totally wrong. Guess my taste memory is a little rusty!


A shortbread cookie, that's what rugelach taste similar to. I think that's why my H adored it because he does love his shortbread cookies. Even if I recalled the taste of rugelach wrong, my impression of it hasn't changed. It's definitely a classic treat that anyone would have a hard time resisting to not nibble on.


Bisou bisou,


Charlotte

Sunday, September 5, 2010

I wanna be a billionaire, so fucking bad,
buy all of the things I never had.

uh, I wanna be on the cover of Forbes magazine.
Smiling next to Oprah and the Queen.

Oh every time I close my eyes.
I see my name in shining lights.

A different city every night oh I..
I swear.

the world better prepare,
for when I’m a billionaire.

Matthew Cwalk ★ // - Wingyee ( Track runners ) ~

Chunky Peanut Butter and Oatmeal Chocolate Chipsters


Funny how life works. On Friday night, I was thinking that I would finally get a chance to bake this weekend. Since I had to run out to the grocery store for dinner ingredients quickly, I chose my recipe rather haphazardly. I seemed to recall a chocolate chip and peanut butter cookie that I made once upon a time, that Sally the dog had eaten before I had really gotten my fill.

I baked said cookies last night. I logged into my blog this morning, and reread my last post about the recipe. And I found that I made this same recipe during Labor Day weekend two years ago. What are the chances??? And where on earth did the time go?

In any case, the cookies are still wonderful. Oh my, that Dorie Greenspan knows how to build a super dessert recipe. The woman should be considered armed with butter and very dangerous to the waistline. But, she sure does deliver.

I am happy to report that I have kept these cookies on the stove, behind a tea kettle and big old empty Dutch oven so that Sally cannot steal them. So far, so good. So very, very sinfully good.

For the link to the recipe, I am sending you to one of my most favorite blogs. Rebecca's posts never fail to make me smile, and very often have me laughing out loud. If you haven't read her blog before, you should really consider starting now. Here is the recipe (and a great post).

Saturday, September 4, 2010

Homemade Lo Mein


Lo mein is one of my favorite foods. Kind of strange, I know. It's among the lowliest of Americanized Chinese food dishes. It's generally an afterthought on the Chinese buffet tables, or one of those slightly-cold, very greasy dishes that you get at the mall food court. But, I love good lo mein.

I suppose one of the reasons I like the noodle dish so much is that it is connected, over and over again, to fond memories for me. When I think of lo mein, I think of Mother's Day at my Aunt Fran's house. We would all sit around and take an hour to decide what we were ordering from the Chinese take out place. My grandfather would hold court, tallying up what everything would cost, so that we could get the most expensive item possible (boneless spare ribs) for free. Back then--or maybe it's more of a Long Island thing--if you ordered "x" amount, you would get an egg roll free, this amount, and you would get wonton soup, etc, all the way up to the coveted boneless spare ribs. We ordered more food than we ever needed, and probably spent a good deal more than the boneless spare ribs would have cost, but getting it for free made Grandpa happy.

Lo mein also brings me back to my first apartment off campus, and the year I met my husband. There was a decent Chinese restaurant around the corner called Chef Chang's. My husband (well, boyfriend at the time) and I would often drop into Chang's for lunches--you couldn't beat the $5.95 luncheon specials. The one I ordered was always the chicken lo mein, an egg roll, and a cup of hot and sour soup. To this day, picturing that dining room in my head brings me back to the feeling of lazy Saturday afternoons with no responsibilities except to maybe get home early enough on Sunday night to write a quick paper or two.

When I found the recipe that forms the base for my homemade lo mein, I knew I had to try it. After all, I'm kind of a lo mein addict. It turned out perfectly--exactly what I had been searching for. As a bonus, this recipe costs less than a dollar per serving--though it could be more, depending on what you add to it. This recipe is so fast and so easy that we made it almost every week during the first few months after my son was born. And, so, this lo mein joins the memory pantheon. I'm sure, when I taste this dish years from now, that it will bring me back to Jasper's newborn days. It will remind me of the sleepless weeks when we were struggling to get Jasper to gain weight. It will remind me of my seemingly permanent station in the rocking chair, nursing, then sitting together while Jasper slept and I watched the Food Network (or read, if I could get an arm free to hold the book). Jasper will most likely come to remember this meal as "when Mommy was in a big rush." Let the lo mein memories continue.

Homemade Lo Mein
Serves about 4, depending on additions
Base:
3 Tbs. olive oil
2 Tbs sesame oil
2 cups shredded cabbage from a bag
1/2 cup chopped green onion
8 oz. angel hair pasta
4 Tbs. soy sauce

Optional additions:
handfuls of bean sprouts (in my house, this one isn't an option--it's a staple)
any and all veggies you want to use (I've found that 1/2 a bag of the frozen stir-fry veggies works very well.)
cooked chicken, shredded (I only do this when I have some that I have to use up)

1. Cook pasta according to package directions. Drain.
2. Heat oil and sesame oil in skillet. Add any "heartier" veggies that you plan to use--broccoli, carrots, etc. If you are using frozen veggies, throw them in now. Sautee until just slightly cooked.

3. Add cabbage and green onion and saute for about 5 minutes more.

4. Add pasta, and soy sauce, and, if you are using them, the bean sprouts and chicken. Toss so that the pasta gets completely coated in the oil and soy sauce, and so that veggies are distributed evenly.

Enjoy.

Homemade Lo Mein


Lo mein is one of my favorite foods. Kind of strange, I know. It's among the lowliest of Americanized Chinese food dishes. It's generally an afterthought on the Chinese buffet tables, or one of those slightly-cold, very greasy dishes that you get at the mall food court. But, I love good lo mein.

I suppose one of the reasons I like the noodle dish so much is that it is connected, over and over again, to fond memories for me. When I think of lo mein, I think of Mother's Day at my Aunt Fran's house. We would all sit around and take an hour to decide what we were ordering from the Chinese take out place. My grandfather would hold court, tallying up what everything would cost, so that we could get the most expensive item possible (boneless spare ribs) for free. Back then--or maybe it's more of a Long Island thing--if you ordered "x" amount, you would get an egg roll free, this amount, and you would get wonton soup, etc, all the way up to the coveted boneless spare ribs. We ordered more food than we ever needed, and probably spent a good deal more than the boneless spare ribs would have cost, but getting it for free made Grandpa happy.

Lo mein also brings me back to my first apartment off campus, and the year I met my husband. There was a decent Chinese restaurant around the corner called Chef Chang's. My husband (well, boyfriend at the time) and I would often drop into Chang's for lunches--you couldn't beat the $5.95 luncheon specials. The one I ordered was always the chicken lo mein, an egg roll, and a cup of hot and sour soup. To this day, picturing that dining room in my head brings me back to the feeling of lazy Saturday afternoons with no responsibilities except to maybe get home early enough on Sunday night to write a quick paper or two.

When I found the recipe that forms the base for my homemade lo mein, I knew I had to try it. After all, I'm kind of a lo mein addict. It turned out perfectly--exactly what I had been searching for. As a bonus, this recipe costs less than a dollar per serving--though it could be more, depending on what you add to it. This recipe is so fast and so easy that we made it almost every week during the first few months after my son was born. And, so, this lo mein joins the memory pantheon. I'm sure, when I taste this dish years from now, that it will bring me back to Jasper's newborn days. It will remind me of the sleepless weeks when we were struggling to get Jasper to gain weight. It will remind me of my seemingly permanent station in the rocking chair, nursing, then sitting together while Jasper slept and I watched the Food Network (or read, if I could get an arm free to hold the book). Jasper will most likely come to remember this meal as "when Mommy was in a big rush." Let the lo mein memories continue.

Homemade Lo Mein
Serves about 4, depending on additions
Base:
3 Tbs. olive oil
2 Tbs sesame oil
2 cups shredded cabbage from a bag
1/2 cup chopped green onion
8 oz. angel hair pasta
4 Tbs. soy sauce

Optional additions:
handfuls of bean sprouts (in my house, this one isn't an option--it's a staple)
any and all veggies you want to use (I've found that 1/2 a bag of the frozen stir-fry veggies works very well.)
cooked chicken, shredded (I only do this when I have some that I have to use up)

1. Cook pasta according to package directions. Drain.
2. Heat oil and sesame oil in skillet. Add any "heartier" veggies that you plan to use--broccoli, carrots, etc. If you are using frozen veggies, throw them in now. Sautee until just slightly cooked.

3. Add cabbage and green onion and saute for about 5 minutes more.

4. Add pasta, and soy sauce, and, if you are using them, the bean sprouts and chicken. Toss so that the pasta gets completely coated in the oil and soy sauce, and so that veggies are distributed evenly.

Enjoy.

Friday, September 3, 2010

Matthew Cwalk ★ // - Maybe ~

Labor Day: Here's to you


This Labor Day come to Santiagos for the hearty Tampiquena. Tampiquena is the most popular combination plates in Mexico, traditionally Steak served with Enchilada with sides. “Tampiqueña” implies that the dish comes from the city of Tampico in Mexico; this is incorrect, but the dish is certainly served there. Jose Luis Loredo—from Tampico—opened his Tampico Club in Mexico City about 1939, and this was his signature dish.

Santiagos serves a traditional 8 oz. seasoned rib-eye served with an enchilado topped with red or green sauce on a sizzling skillet with rice, refried beans and a side of our house made guacamole. Yes, it is time to rest from your labors, come to Bisbee and celebrate Santiagos style.

Thursday, September 2, 2010

Summer in a Bowl


There are some things that can only be enjoyed during the summer. Corn on the cob. Fresh, sweet, juicy peaches that have been picked from the tree that day. Heirloom watermelons with sherbet orange flesh. And tomatoes. Real, vine-ripened tomatoes, still sun-warm when you bite into them. In my case, a rainbow of heirlooms, ranging from the tart and tangy green zebra to the mellow and sweet yellow "peach."

This dish is about summer. It's about the freshest ingredients, used at the height of ripeness--and almost no embellishment. And yet, somehow, with so little cooking and so few ingredients, it will be the best meal you eat all season. This is the dish you dream about in the darkest days of January, when the snow is falling, and summer seems like it will never come.

I came across this recipe in Moosewood Cooks at Home, one of my go-to cookbooks. It's so simple that you really don't need a recipe at all. Boil some pasta. Throw chopped super-fresh super-ripe tomatoes into a food processor. Add garlic, olive oil, salt, pepper, and a few fresh basil leaves into a food processor. Whirl it up until it's smooth. Chop up some extra tomatoes for garnish. Cube some fresh mozzarella cheese. Drain the pasta. Put it in a bowl. Toss it with the mozzarella while the pasta is still piping hot. This creates gooey strands of cheese throughout the dish. Toss with the pureed sauce and chopped tomatoes. Serve, preferably with some nice crusty bread, and maybe a light green salad. That's it. But, it's perfect. The season, captured in a bowl.

You can find the recipe here, or feel free to improvise. I have submitted this entry to Grow Your Own #45. Be sure to check out the round-up there, to see what other bloggers have made using produce from their own gardens and farms.
You don't have to care anymore.

It's not 'Us'
It's;

You
Me now.
I've been lonely, I've been waiting for you.

I'm pretending, and that's all I can do..

The love I'm sending, ain't making it through to your heart..


Pain, since I've lost you, I'm lost too.
Nigga feelin' like he at the bottom like a horse shoe.


Sorry for the trouble that I put you and your heart through.

God knows that I'd do anything for a part two, or to,
be prayin' for the day you come back to me, sayin' that you forgive me..


Give me another chance, I'm needin' it like a kidney.


I don't wanna advance, give me back her hands.

Give me back her touch, I don't ask for much.


But I fucked up, I know I fucked up, I admit I fucked up.
But everybody fuck up, now this other nigga lucked up..


Tellin' me and my clique don't give a fuck.


Cause um, we from New Orleans, she was from Georgia.


She was my down chick, I was her soldier,
I was her gangsta, she was my shoulder.


You were the pistol to my holster..